
How to Migrate Your App to the AWS Cloud
There are a lot of great reasons to host your application in the cloud, like performance gains, cost savings, and security. If you’re contemplating a move from your on-premises software application to the cloud and aren’t sure where to begin, this guide is for you!
Defining the Problem
Imagine you have a web application—let’s call it “NextGenSolutions”—that has been the backbone of your business for nearly a decade. This application has a monolithic architecture, or a single tiered application that combines multiple components such as the view, business logic, and data access layer into one large application. This application is hosted on-premises and was built with a relational database, a backend, and a frontend. Initially, NextGenSolutions was a cutting-edge application, but now it struggles with performance during peak hours. Slow load times and sluggish responsiveness are frustrating users and are also negatively impacting your business. An initial diagnosis suggests that the problem is caused by the web server running low on CPU capacity (central processing unit). A natural solution is to buy another server with a higher max CPU capacity.
Investing in a new server addresses the immediate CPU shortages, but it is expensive and may not offer a lasting solution. If demand continues to grow, you’ll more than likely need to upgrade the server again, creating a vicious cycle of costly investments. Purchasing servers in this fashion will likely lead to overprovisioning to account for future load. This results in the server’s CPU being underutilized until it isn’t, at which point it becomes critical to fix. Migrating to the cloud offers a more sustainable path for application longevity by providing flexible and scalable resources tailored to demand.
What Are My Options?
The main strategies for cloud migrations include lift and shift, full refactor, and hybrid.
The lift and shift approach involves moving an application from your own environment to the cloud by making minimal changes. This approach is usually the quickest, but doesn’t fully take advantage of the cloud infrastructure and its cost savings.
Another option is a full refactor. Even though this choice requires more initial planning and overall work, it uses the cloud environment to its fullest potential.
If you're not completely sold on the cloud or do not have the time or resources for a full refactor, a hybrid approach is a good stepping stone. With this approach, you migrate parts of your app to the cloud while keeping others on-premises.
For the purpose of this exercise, we will discuss the scenario of migrating NextGenSolutions—an on-premises monolithic application—to the cloud, specifically Amazon Web Services (AWS) using an iterative full-refactor method, and list all the steps to de-risk the process. As a Certified AWS Partner, Crafted is qualified to help you transform your app and can guide you through the cloud development process. This approach not only minimizes risks but also enables a systematic transformation that allows for optimization and scaling in the cloud environment. Below is a general outline of the steps involved in this migration process.
Getting Started
Initially in our example with NextGenSolutions, we mentioned the application has a frontend, backend, and a relational database. Here’s a diagram of your starting architecture:

Before we start the migration, we recommend setting up IAM (identity and access management) permissions within an AWS-declared organization and apply the principle of granting least-privilege permissions to each teammate. This will only allow a small number of accounts to launch a list of pre-approved resources, thereby creating an additional layer of protection against using unapproved resources.
We also recommend using any available rebates and discounts that AWS offers. For many of their services, AWS offers free tier eligibility that allows customers to experiment and adjust their infrastructure before making it production ready.
Refactoring
Step 1 - Scoping and Permissioning
The first step towards migrating to the cloud is scoping and planning. The final goal of the migration is to modularize the app into different components and host each component separately in AWS. In the context of our app NextGenSolutions, we can think about this problem by breaking down our app into three components: a database, a frontend, and a backend.
Step 2 - Moving the Database
Once you register an account and set up permissions within your organization, the next step is to migrate your database to AWS.
Amazon RDS (Relational Database Service) is a great place to start. RDS is a managed database service that supports many popular database engines including Microsoft SQL Server, MySQL, and PostgreSQL. Out of the box, RDS has many benefits over a standard database including automated backups, scaling, failure detection, and recovery, and with some additional configuration, it also provides high availability, protecting your data from regional outages.
If your database does not use one of the engines automatically supported by RDS, the AWS Schema Conversion Tool could benefit your migration. With this service, you can convert your existing database schema, including most of the SQL, views, and stored procedures, to a format compatible with the RDS database.
While Amazon RDS is an excellent option, AWS Aurora, another managed database service, brings the benefits of RDS plus even more advantages. Aurora is fast: it offers up to five times the throughput of standard MySQL databases and three times the throughput of PostgreSQL databases. It is also highly available by design, as Aurora replicates data six ways across three Availability Zones (AZs) so it can always recover from a crash without the need for crash recovery. It is only compatible with MySQL and PostgreSql, but like RDS, it can be used in combination with the Schema Conversion Tool to support different database engines.
Before the new database is created, it is important to secure your new resource. First, create a security group for your AWS Cloud Virtual Private Cloud (VPC). A security group is a collection of rules that control the inbound and outbound traffic. In this VPC security group, create rules that allow traffic to and from the web server, . in which you define the IP addresses/protocols allowed to make incoming connections with resources in your VPC.
By the end of this step your architecture will look like this:

Step 3 - Moving Frontend and Backend
If you are working with a monolithic application, it’s generally recommended to use Elastic Beanstalk or Amplify. These services are great for simplifying deployment, management, and scaling of a full stack application. Elastic Beanstalk supports many popular languages like Java, .NET, Node, and Python. Amplify is similar but relies on AWS’s serverless infrastructure for backend tasks. If Elastic Beanstalk and Amplify do not meet your needs, you can use Amazon S3 to serve a static frontend or EC2 to dynamically generate your content.
Frontend
When refactoring your frontend, there are a couple things to consider. If the content served is a simple static website or single page application, hosting on S3 can be a cost effective and scalable solution. S3 is a highly scalable storage service asurring 99.999% durability, which almost guarantees your data is safe from corruption. S3 can be combined with another service, Cloudfront, to speed up the distribution of your content. It costs more, but with this service, your content will be cached on AWS servers around the world to distribute your content to users with the lowest latency possible. This is a great option for our example application, NextGenSolutions. If our frontend is being served using server-side rendering, we must look at other options like EC2.
To secure these S3 resources, you can implement several best practices. First, ensure all buckets are set to private and use IAM roles and policies to strictly control access permissions. Second, set up bucket policies to explicitly define who can access the objects in your buckets and the conditions in which they can access these.
EC2, or elastic cloud compute, is a web service that allows you to launch and manage virtual servers (known as EC2 Instances) with multiple options to configure CPU, memory, storage, and network capacity as needed. Scaling is supported with the use of another service, the Elastic Load Balancer (ELB). If configured with an auto-scaling group and scaling conditions, your EC2 instance will scale to meet the demand of your business dynamically.
To secure your frontend, we recommend setting up Amazon Cognito with IAM. Cognitio can create and manage a user directory at large scales. It provides easy sign in, sign up, and can be combined with IAM to grant access control to your web application.
Backend
If there is complex logic in the backend of your application, it will likely be hosted using EC2. This option provides you with full control over the server environment, allowing you to install and configure the necessary software and dependencies for your backend application. Using this architecture, you could modularize your backend into microservices, further allowing you to granularly scale the parts of your backend application in a similar way that was described in the frontend section.
For the backend, as long as the Auto Scaling group is in the same VPC, the same security rules we defined in the database section will apply. In addition to that, the Cognito user management set up in the previous set can be used to control access to certain actions.
If you decide to use an EC2 Instance for your frontend and backend, your architecture diagram will look like this:
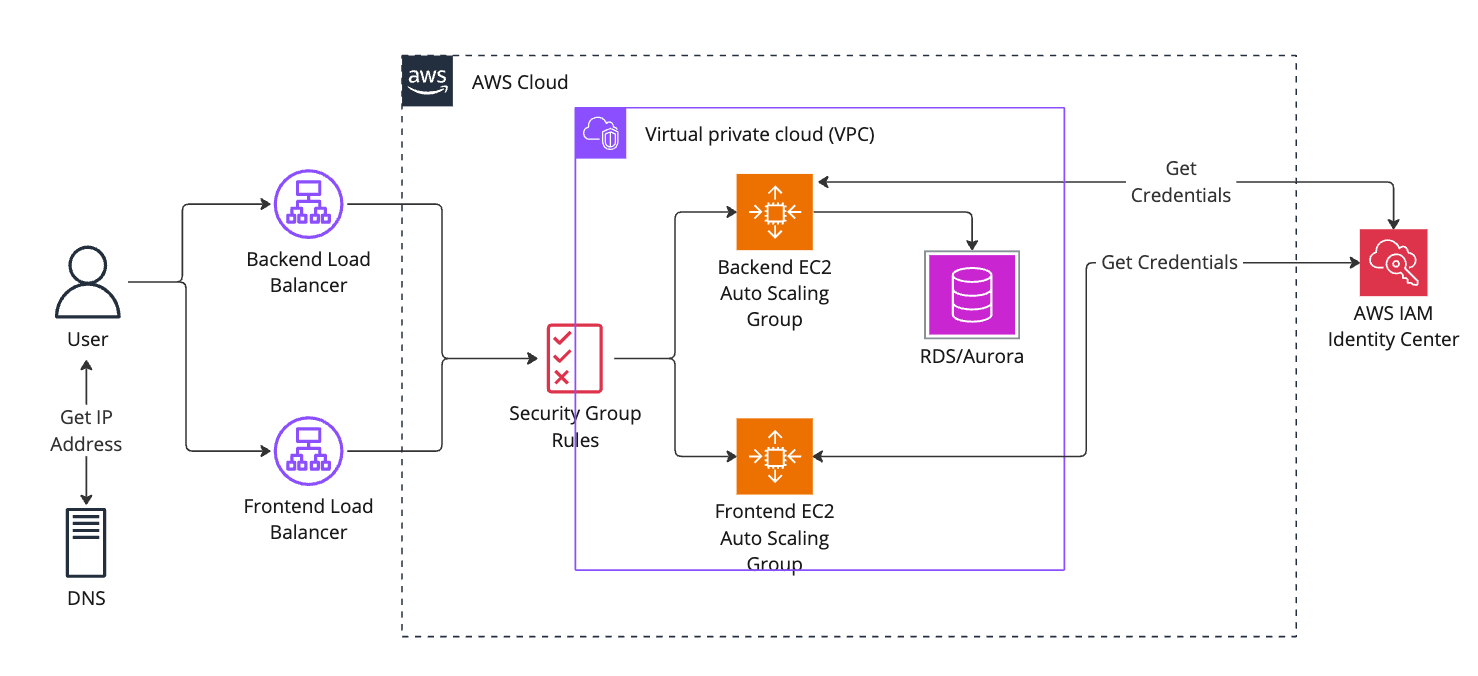
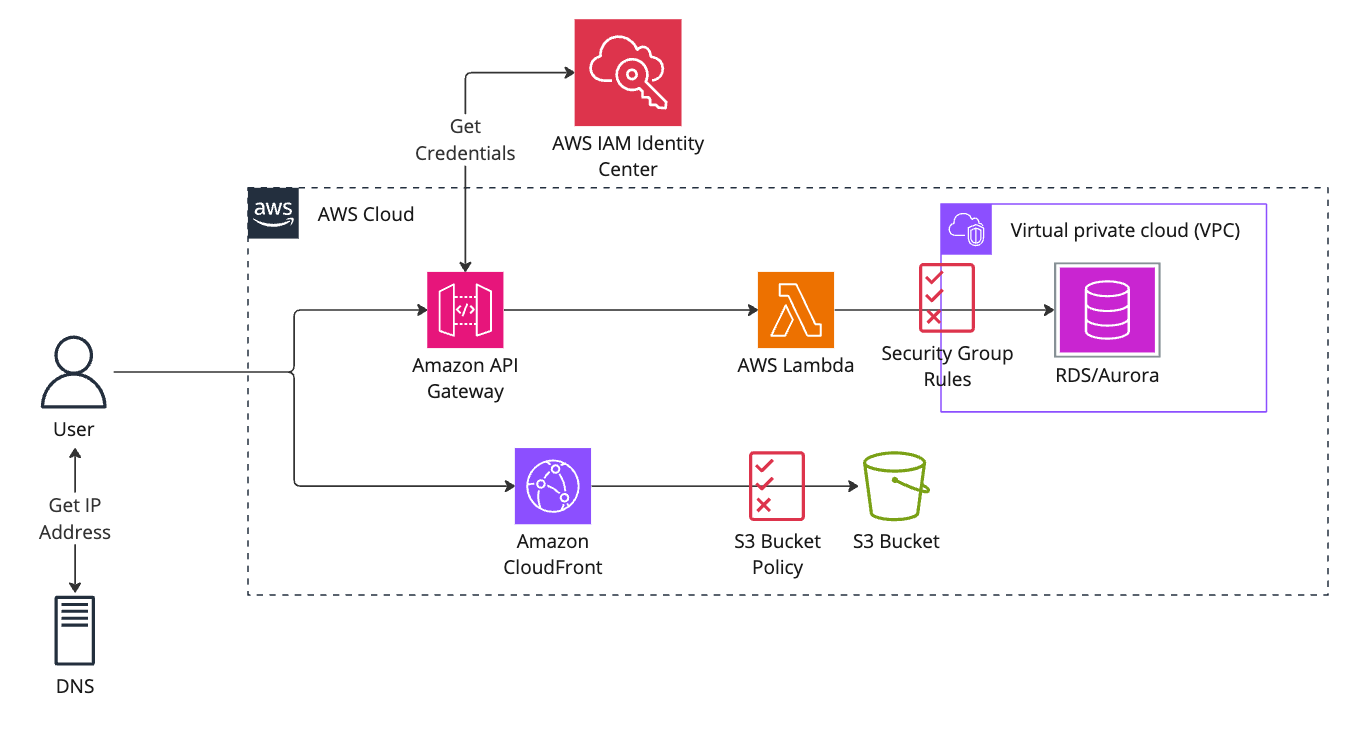
Another option is to orchestrate different AWS services to work together to replace your existing backend. One way to do this is by using AWS API Gateway alongside AWS Lambda. The API Gateway acts as a secure entry point into your serverless backend, providing a way to manage and expose your APIs. When a request is made, the API Gateway triggers AWS Lambda, a short-lived, on-demand process that calls your backend functions. This serverless approach eliminates the need to provision and manage servers, as AWS automatically handles the underlying infrastructure and scales your functions based on demand.
Taking the serverless approach with a S3 hosted frontend, your architecture will look like this:
Step 4 - Route Traffic to New Instance
Regardless of which strategy your team decides to choose, now that the application is hosted in the cloud you can set up Route 53, Amazon’s DNS service, to manage routing traffic. This service offers considerable flexibility, including weighted routing. Weighted routing allows you to associate multiple IP addresses with a single domain name and specify the percentage of traffic each receives. This allows you to slowly distribute traffic between the on-premises and cloud instances and monitor the performance and costs of both. After successful testing and monitoring (and once your team is confident enough), you can direct 100% of traffic to the new AWS-hosted instance. You can then use additional tooling for automatic scaling and ensuring availability by spinning up new instances in different Availability Zones.
After configuring Route 53 to distribute traffic between your newly migrated application and your old on-premises infrastructure, your architecture will look like this:

Additional Considerations
Another step we highly encourage you to take is to set up different environments (dev, test, etc.) for your application. Having different environments allows you to test your new versions in an isolated environment before deploying to production. This is made easy with using Amplify and Elastic Beanstalk. To use these two services you must first create an environment configuration. Once created, you can easily deploy new versions of the same application with a click of a button. With EC2, recreation of an environment is possible but requires more steps, since each resource used in the architecture must be re-created and configured manually. This is much easier if you define an architecture model using AWS CloudFormation. After creating a template, a description of resources and their dependencies, you can launch and configure them together in different environments simultaneously.
With this in place you are able to deploy your software to production with confidence!
Conclusion
The journey of migrating your on-premises software application to the cloud is not just a pathway to leveraging modern computing's benefits. It's a strategic move towards ensuring your organization's agility, scalability, and competitiveness in today's digital landscape. By dissecting the migration process into digestible components—namely the database, frontend, and backend—we've demonstrated that each segment of your application can be successfully transitioned to the cloud with careful planning and the right set of tools and services provided by AWS.
The cloud migration journey is unique for each organization. It requires a deep understanding of your current infrastructure, clear objectives for the future, and a willingness to embrace new technologies and methodologies. With the insights provided in this guide and the expertise of a Certified AWS Partner, your path to a successful cloud migration is well within reach. Reach out to Crafted today, and let us help you harness the full potential of the cloud for your organization.